Remember learning equations in school and wondering when you would actually use them? If you ship freight, here is one worth keeping: weight divided by volume. That simple calculation helps you understand how much space your shipment takes up relative to its weight.
For less-than-truckload, or LTL, shipping, accurate density matters because many freight classifications depend on it. A missed pallet measurement or an estimated weight can change the result and contribute to an unexpected adjustment on your freight bill.
Fortunately, you need only a tape measure, a reliable scale, and a calculator. Here is how to calculate LTL freight density, work through a realistic example, and avoid common measurement mistakes.
Key takeaways
Freight density equals total shipping weight divided by total cubic feet.
Include the pallet, packaging, and any protruding parts when measuring and weighing.
Convert cubic inches to cubic feet by dividing by 1,728.
A 250-pound shipment measuring 40 × 48 × 30 inches has a density of 7.5 lb/ft³.
Confirm the applicable NMFC item and carrier requirements before assigning freight class.
What is LTL freight density?
Freight density describes how much a shipment weighs for each cubic foot it occupies. It is usually expressed as pounds per cubic foot, abbreviated PCF or lb/ft³.
Imagine two pallets with identical outside dimensions. One holds lightweight plastic containers; the other holds metal components. They occupy the same amount of trailer space, but the heavier pallet has greater density.
That relationship helps explain why weight alone does not tell the whole shipping story. A large, lightweight shipment can occupy substantial space even when its scale weight is modest. Calculating density gives you a consistent way to describe the relationship between weight and space.
The LTL freight density formula
Density = total shipping weight in pounds ÷ total volume in cubic feet.
When your measurements are in inches, calculate volume first:
Cubic feet = length × width × height ÷ 1,728.
Then divide the shipment's weight by that result. The conversion number comes from 12 × 12 × 12: a cubic foot contains 1,728 cubic inches. Keep your units consistent throughout the calculation.
Step 1: Measure the complete shipment
Measure your freight after it is packed and ready for pickup. Record the greatest outside length, width, and height of the complete handling unit, including its pallet and protective materials.
For palletized freight, measure height from the bottom of the pallet to the highest point. Use the greater outside dimension wherever the pallet or freight extends farther. Measuring just the cartons can leave part of the shipment out of your calculation.
For our example, the complete shipment measures 40 inches long, 48 inches wide, and 30 inches high. Those are finished shipping dimensions, including the pallet. If your product dimensions come from a catalog or warehouse record, verify them against the actual packed shipment before using them.
Step 2: Calculate cubic inches
Multiply the three measurements:
40 × 48 × 30 = 57,600 cubic inches.
This gives you the volume of the rectangular space occupied by the handling unit. The order of length and width does not change the multiplication, but recording them consistently makes shipment records easier to check.
Write down the result before moving to the conversion. Separating these steps makes it easier to catch a mistyped dimension, especially when you are calculating several pallets during a busy shipping day.
Step 3: Convert to cubic feet
Divide the cubic inches by 1,728:
57,600 ÷ 1,728 = 33.333… cubic feet.
Your shipment occupies approximately 33.33 cubic feet. Keep the full calculator value for the next step rather than rounding it early. You can round the displayed result afterward, following any applicable carrier requirements.
Do not divide by 12. That converts a single linear measurement from inches to feet. Volume has three dimensions, so the correct conversion factor is 12 cubed, or 1,728.
Step 4: Weigh the packed freight
Now weigh the complete handling unit. The shipping weight includes the goods, pallet, cartons, wrapping, and other packing materials. Product weight alone will not represent what the carrier receives.
For this example, assume the scale shows 250 pounds for the finished shipment. Use that gross shipping weight in your calculation. If the shipment changes after weighing, such as when someone adds another carton or replaces the pallet, update the weight and dimensions before finalizing the shipping details.
Step 5: Calculate freight density
Divide total weight by cubic feet:
250 ÷ 33.333… = 7.5 lb/ft³.
That is your freight density: each cubic foot of the shipment represents 7.5 pounds. You can also calculate it in one line:
Density = (250 × 1,728) ÷ (40 × 48 × 30) = 7.5 lb/ft³.
The longer method is useful while learning or checking someone else's figures. The shorter version works well in a spreadsheet or calculator once you understand the units. Both methods should produce the same answer when you enter the same measurements and weight.
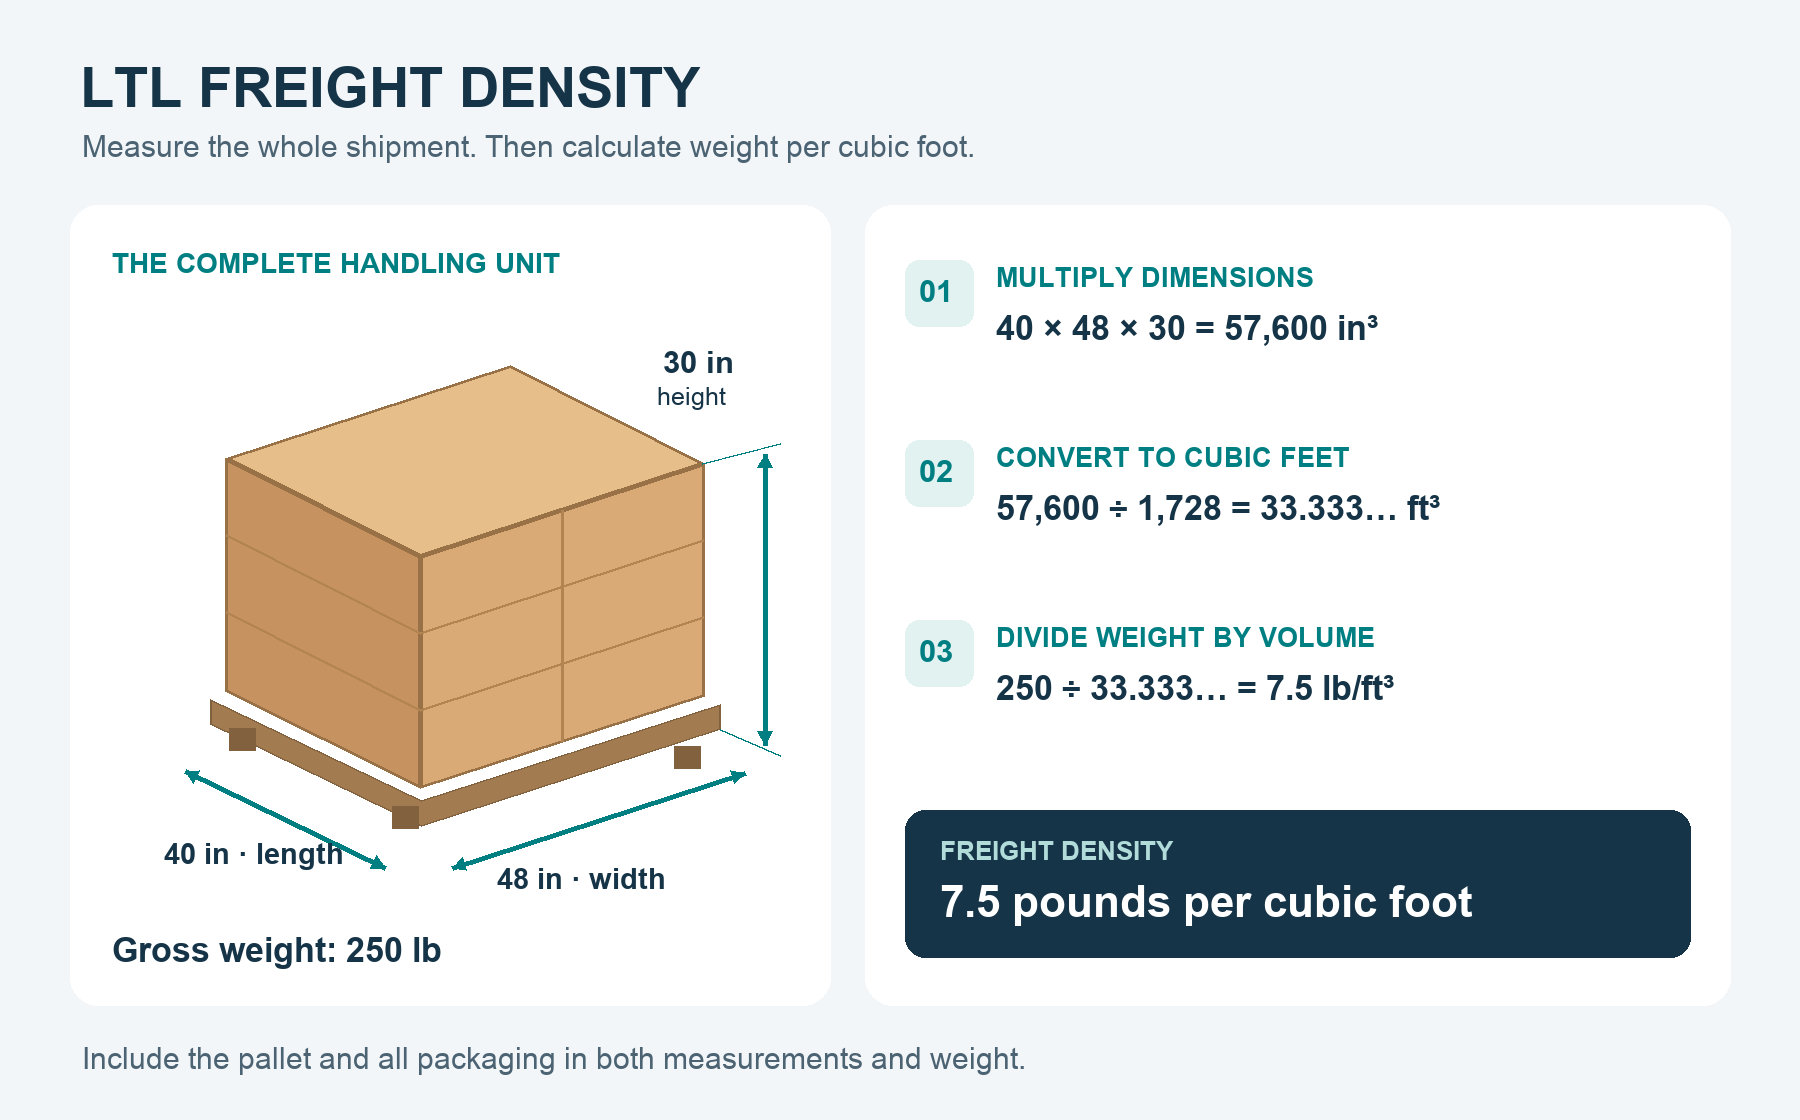
Worked example: 40 × 48 × 30 inches and 250 pounds gives a density of 7.5 lb/ft³.
How density affects freight class
Density is an important classification input, but it does not automatically identify the correct class for every commodity. The National Motor Freight Classification, or NMFC, also considers handling, stowability, and liability characteristics.
Under the standard 13-subprovision density scale, a density of at least 6 but less than 8 PCF corresponds to Class 125. Our 7.5 PCF example fits that band only if the applicable NMFC item uses that scale.
Verify your commodity's current item number, description, packaging requirements, and subprovision. NMFTA's ClassIT+ or your carrier can help you confirm the applicable classification. A general density chart is a reference, not a substitute for identifying the item correctly.
Common freight density mistakes
Leaving out the pallet changes both weight and volume. Measuring before the final wrapping or packaging is added can also produce figures that do not match the shipment at pickup.
Another mistake is measuring a convenient flat surface instead of the greatest outside dimensions. Overhanging cartons, projecting parts, and protective packaging can increase the space the freight occupies. For unusual shapes or nesting arrangements, check the applicable measurement rules rather than assuming the product's internal volume is appropriate.
Avoid reusing old dimensions without checking the current load. Packaging changes, different carton counts, and revised pallet patterns can change density. Do not average individual pallet densities to obtain an overall figure; calculate total weight divided by the sum of their individual volumes.
If a carrier finds different dimensions, weight, or commodity information, it may reclassify or rerate the shipment. That can lead to additional charges under the applicable terms. Checking the final load before pickup gives you a better starting point for an accurate quote.
Working with multiple pallets
Measure and weigh each handling unit separately. Calculate each unit's cubic feet, then add the volumes together. Add the weights separately and divide total weight by total cubic feet to calculate the overall shipment density.
For example, two identical pallets from our example weigh 500 pounds and occupy 66.666… cubic feet. Their combined density remains 7.5 PCF.
Keep the individual pallet records, even when you calculate an overall figure. An overall density does not establish how every handling unit or commodity should be classified. Confirm whether the applicable NMFC provisions and carrier terms require separate calculations, especially for mixed commodities or pallets with different densities.
A quick check before pickup
Compare the dimensions, weight, commodity description, and classification on your shipping paperwork with the finished freight. Keep measurement records and scale readings; clear photos can provide useful supporting context if a question arises.
Accurate information helps reduce avoidable discrepancies, although it cannot guarantee that a carrier will never inspect or adjust a shipment. Make the calculation part of your packing routine: measure, multiply, convert, weigh, and divide. Once those five steps become familiar, freight density becomes a straightforward check you can repeat for every shipment.
Accurate freight density gives your team a better starting point for quoting. At Freitt, we help freight forwarders carry shipment details into the quoting process with less manual work. Our email-to-quote automation extracts weights, dimensions, and other shipment information from customer emails and attachments, flagging missing or uncertain details for review.
Our rate-sheet automation matches requests against your own valid rates, while our road freight quoting solution applies the lane, zone, or distance rules and additional charges listed in your sheets. Your team checks the shipment details, confirms the applicable freight classification, and approves the quote before sending. Book a Freitt demo to see the workflow using your own shipment request and rate sheet.
Frequently asked questions
Do I include the pallet in freight density?
Yes. Include its weight and dimensions, along with the freight and packaging. Measure the finished handling unit as it will be handed to the carrier.
What is the density of a 250-pound, 40 × 48 × 30-inch shipment?
Its volume is 57,600 cubic inches, or 33.333… cubic feet. Dividing 250 pounds by that volume gives a density of 7.5 pounds per cubic foot.
Does higher freight density always mean a lower shipping price?
No. Higher density can correspond to a lower class under an applicable density scale, but the final quote also depends on the shipment's route, weight, service requirements, and carrier pricing.
Can I use an online freight density calculator?
Yes. Enter the complete packed dimensions and gross weight in the requested units. A calculator handles the arithmetic, but accurate measurements and the correct classification still depend on the information you provide.
Should I round density before selecting a freight class?
Keep the unrounded result when checking a density threshold. Premature rounding can move a shipment across a class boundary. Follow the applicable classification and carrier rules for reporting measurements and results.